Your iPad does a lot better job than mine!
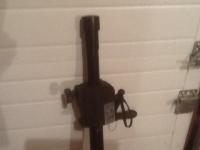
Here are a couple of poor iPad pics of the capped top and bottom of the lifter.


Advanced Member


Posted 11 January 2014 - 01:27 AM
Senior Member

Posted 11 January 2014 - 04:33 PM
Here's what mine look like: http://www.amazon.co...R/dp/B001IHOEUG
I use the ones that don't have an opening.
Free Range Human

Posted 11 January 2014 - 08:06 PM
It's stormy outside (purported 33 foot seas at the beach), so I am not wandering far today. I spent a bit of time in the shop making plates for the roof hand crank. I still need a bit of router work, a little sanding, and a coat or seven of spar varnish or Cetol. The smaller plates will screw into the roof lifting panels, the larger will be a free floating base for the crank.

Edited by Wandering Sagebrush, 11 January 2014 - 08:07 PM.
I am haunted by waters
Senior Member

Posted 11 January 2014 - 08:39 PM
You guys do very nice work. Those look great and would make the process even faster I'm sure.
FYI for anybody who's considering the crank-up, you don't necessarily "need" anything to hold it in place, although that's certainly a nice feature. When you imagine it (if you're like me), you probably think the thing just wants to slip out of place ASAP when the roof is at an angle, which would of course screw up your ceiling and roof. It's actually more stable than that.
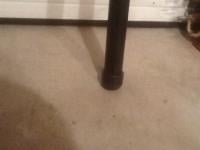
I've only used the crank a handful of times (I keep it in the camper in case it snows a lot or my wife needs to raise/lower) but I'm comfortable just keeping a hand at the top of the lifter to make sure it doesn't poke a hole in the ceiling. But if you have the skills/equipment to make plates I'm sure you'll be even more confident. I ended up making a 5x5 board with a 1/4 inch lip on one end to put between the lifter and the lifting board - just to spread the load a little.
Also, if you have a shell (or if you buy a short lifter), you might find these lifters to be too short. You can fix that by putting a few short pieces of 2x4, or a block of some sort, sturdy stepstool, or whatever underneath the lifter.
2012 Eagle Shell with a few extras
Senior Member
Posted 11 January 2014 - 08:53 PM
Thanks everyone.
Senior Member

Posted 13 January 2014 - 03:32 AM
I'm a little confused about the lift height, if you go to this link http://www.guitarcen...418-i1170318.gc it says in the specs that the lift height is 31" to 61", am I missing something, this does not sound like it would be of any use. Also the lift rating is 80#, I wonder what the lift load is in pounds for each half of the roof with nothing on it. It seems to me that you could load the yakima racks with 100 or 150#s pretty easily. It sounds like this devise could fail during use. I wonder if the one offered by FWC has a higher lift rating ?
Senior Member

Posted 13 January 2014 - 04:36 AM
Free Range Human
Posted 13 January 2014 - 04:36 AM
I bought the crank-up light stand . It has a larger range, but the same weight rating. I don't think the weight is going to be an issue, but could be wrong. We'll find out.
Edited by Wandering Sagebrush, 13 January 2014 - 06:06 AM.
I am haunted by waters
Senior Member

Posted 13 January 2014 - 05:09 PM
Newbie

Posted 16 January 2014 - 08:28 PM
My Grandby came without struts, and I thought I would add them until I saw this thread. Instead, I bought the speaker stand off Amazon for $77 and free shipping: [http://www.amazon.co...0?ie=UTF8&psc=1] and also this speaker mount bracket accessory with it for another $5.95: [http://www.amazon.co...0?ie=UTF8&psc=1].
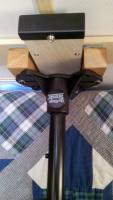
The tripod on it was mounted with nuts and bolts, so was easily removed without drilling out any rivets, so maybe they have changed the design from what I saw mentioned early in this thread? I put one of the rubber pads from the tripod legs over the bottom tube, as mentioned, and mounted the bracket on top. Then I cut a couple of small hardwood blocks from some 1-1/2" stock I had laying around, and glued a piece of 1/4" high-density foam rubber to the top of each one, then mounted them onto the top of the bracket with wood screws. This makes a nice U-shaped yoke to span the center latch in back and the tilt-panel lifting handle in front, and also spreads the load to two points on the roof-lift board, while keeping it centered. (You have to guide the push-handle board out through the yoke as as it slides through it while the top goes up, just to make sure it doesn't catch on the button on the bottom that secures the board to the roof with the nylon strap.)
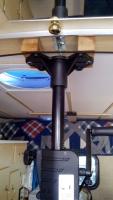
Even with the top bracket extending it 2" or so, the jack is still a little short, so I use a 4x6" block of wood under it (6x6" might be better, as I still go right to the "Maximum" lift mark and a little beyond), with some of the same foam rubber glued to the bottom of it to prevent slipping. Despite the slight angles involved in cranking the roof up, the rubber provides sufficient friction that nothing has ever slipped yet. Going up and down is easy, even for my wife, and fairly quick just using the hand crank, without any drill attachment, IMHO, but it is nice to be able to attach a cordless drill if it's not fast enough for you without it. I find the hand cranking pace just fine myself. I don't have any roof racks or solar yet, so no load on the roof to be able to speak to the weight capacity of the stand, but it seems very adequate. Here's some pics of my setup.

Edited by Stewball, 16 January 2014 - 08:35 PM.
2001 F-250 Supercab PSD longbed w/ 2009 Grandby model FWC


0 members, 0 guests, 0 anonymous users

